 The front windows are going in this week. The rear windows are all in (except at the stair).
21 December 2010
Sealing it up!
The front windows are going in this week. The rear windows are all in (except at the stair).30 November 2010
Shed a little light

The sidewalk shed was removed on Monday and now there is so much more light on the 1st floor. This is especially good with the short gray days.
18 November 2010


14 November 2010
Look Mom, no scaffolding!
 On Friday as we were busy placing the electrical outlets and the framers were framing out the 3rd floor, the masons finished the last of the cementboard that required the scaffolding. Now they are placing the last of the cementboard that is at the level of the sidewalk shed and below. We are really anxious for the sidewalk shed to come down too. Soon.
12 November 2010
What a week!
Plumbers ran the tubing for the radiant floor heating. The framers followed framing the 3rd and 4th floors of 103 Boerum Place. I had marked all the walls and door openings with blue masking tape ahead of time, so that they had lines to follow.
 This is the bathroom door and walk-in closet door standinge in the Master Bedroom. I had also marked all the electrical outlets so that John & I could attach the boxes. The electricians will come once all the walls are framed.

 The plumbers also attached all the rough-ins for the wall mounted toilets on the 3rd and 4th floors.
The framers followed framing the 3rd and 4th floors of 103 Boerum Place. I had marked all the walls and door openings with blue masking tape ahead of time, so that they had lines to follow.This is the bathroom door and walk-in closet door standinge in the Master Bedroom. I had also marked all the electrical outlets so that John & I could attach the boxes. The electricians will come once all the walls are framed. The plumbers also attached all the rough-ins for the wall mounted toilets on the 3rd and 4th floors.While all this was happening inside, the sun was shining and the masons were continuing the cement fiber board. The scaffolding is down and only the sidewalk shed is left. I will post an image of that this weekend.
08 November 2010
More Facade


Another layer of the facade was exposed today. The bricks were cleaned before the scaffolding was brought down. It is looking great!!!
02 November 2010
and the facade goes on
The cement board has many steps. The first step is putting a liquid primer on the masonry blocks - as seen in this photo.


This photo shows the finished metal capping.
 Then comes the metal furring strips.

 As the cement board is fastened the scaffolding is coming down exposing the finished facade.
The second step is adhering the Grace Product Perm-A-Barrier to the block. While this is being done the treated lumber that frames the window openings is being capped with a matte black metal capping. We worked with a local metal fabricator to get the exact profiles that would fit over the wood.

This photo shows the finished metal capping.
 Then comes the metal furring strips.
  As the cement board is fastened the scaffolding is coming down exposing the finished facade.
27 October 2010
Here's the skin-ny
 The masonry brickwork is complete. The remaining material is the cementboard. There are a few steps that need to be done before we can attach the cementboard. The concrete blocks must first be sealed with a liquid primer. This ensures that the surface is dust free so that the perma-barrier (the black material) can adhere to the concrete block. Metal furring strips are anchored and caulked. Metal furring strips receive a rubber gasket that is sandwiched between the exterior fiber cembentboard and metal furring. The cementboard is predrilled and fastened with stainless steel screws with matching colored heads. Hopefully the weather holds up.
 16 October 2010
The calm before the storm


 With the wind blowing, the masons have been tediously working on the brick on the front facade. The brick will frame the cement fiber board which is waiting to be installed once the masons finish.
15 October 2010
Team Work


The plumbers and the framers are working together to get the job done. Today they were in the cellar running pipes and framing the walls for the bathroom, mechanical room and storage room. So many workers in the Cellar and lots of work.
Blocking for the Stair
 Much time was spent attaching extra support for the new stair that is being frabricated off-site. Wood studs were used and anchored to the masonry walls. The masonry walls were painted with Durlock to prevent moisture.
Frame around the Edges

 The crew first started framing the exterior walls with metal studs. They also framed around each of the windows. They started on the 4th floor and continued down to the cellar. These two floors are the 3rd and 4th floors where there will be bedrooms. The warmboard can be seen on the floors.
29 September 2010
Let it Rain

 This week is the first week that we are not constantly looking at the weather forecast. We are working inside a very dry building. Work has resumed with the installation of the radiant floors, and marking up with blue tape the centerlines of the walls. Framing of the walls will begin next week.
frame it


Window prep work has been completed. Two pieces of wood blocking have been attached to the block walls on the sides and top, and a slate sill has been installed on the bottom. All window openings were measured three times and we are currently waiting for a sample window to be delivered to the site, to verify the depth and sill. Then the window production will begin.
15 September 2010
Coping
Today most of the coping stones were installed. Coping stones are the top edges of the masonry walls. They are pitched to allow the rain from sitting on the top of the walls. This is the finish top of the wall. Tomorrow they will finish this work and start on the stone sills on the rear of the house.


06 September 2010
The roof, the roof, the roof is on.....


The roof consists of a series of layers on top of the plywood decking. First, the plywood decking was vacuumed and mopped, before the firestone self adhesive underlayment was placed. The next layer is sheets of 2" rigid insulation that are attached with 3" epoxy coated screws with large galvanized washers. Cant strips were placed in the intersection of the roof and parapet walls. Another layer of the firestone self adhesive underlayment, was applied. The top layer is a firestone rubberized cold application roof with a white granular finish. The remaining exposed parapet will be parged on the interior side.
30 August 2010
Bulkhead
Now that we have had some beautiful (and hot) weather, the bulkheads are really taking shape. The bulkhead is the enclosure for the stair as it continues up to the roof. The two exterior sides are block, while the two interior wall are heavy gauge steel studs, with exterior grade plywood. It will get a finished layer of cement board, but not until the roofing is complete.


22 August 2010
All Block Done
Done!! The mason finally finished all the block! It was a long time, fill with weather, building department issues, and coordination of the other trades. Here it is....
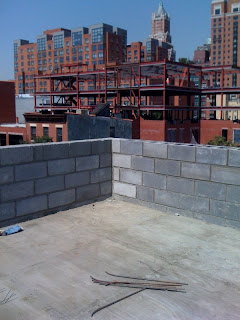
 This is the low party wall separating the two buildings on the roof.
 The tall portion in the back will be the stair bulkhead.


The bulkhead will have two exterior sides of block and the interior sides will be framed with metal studs. The masonry is prepped to receive the joists.
 The roof is pitched to the rear of the house, where the roof drain is. (Like the tennis bubble?)Next is framing the rest of the bulkheads, setting the coping stones, and then the final roof.
19 August 2010
Up on the Rooftop
The masons are on the roof, putting the last of the blocks on the parapets and bulkhead. The bank inspector was there today, so we went up to the roof to document the amount of work completed. I am loving the territorial views - no major landmarks, but we can see a few buildings in lower Manhattan, along with beautiful downtown Brooklyn.


Subscribe to:
Posts (Atom)
